
chapter 2
Commanding Methods
1.

Commanding Technicalities
Line Orders
When creating a line order, the commander will base the order of riders on the riders' speed; thus, allowing the rider line to be set up for success. Faster riders should be at the front of the rider line while slower or laggy riders will be placed at the back of the rider line.
If you are ever unsure of where to place specific riders in line, you can do a speed test. Have the riders you wish to test stand against a wall and on "go" walk forward, watch the riders closely to see which one is faster.
Note that at this time, there is NO speed difference between high-level players that have maxed and happy horses. A level 20 player on a maxed and happy horse is the exact same speed as a level 24 player on a maxed and happy horse (both wearing the same stat outfit/tack). However, this may only be short term and the speed differences may go back to normal in the future.
The diagrams below demonstrate and explain how line order is chosen based on each rider.
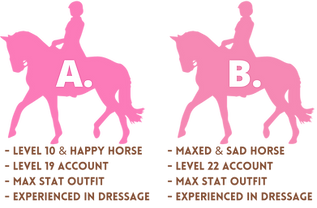
Rider A would be placed ahead of rider B. Even though rider B is a higher level and on a higher level horse, they are riding a sad horse and a sad horse will always be placed at the back of the rider line.
example
Line Order
-
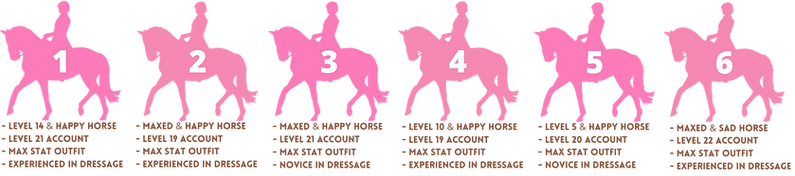
Riders 1 and 2 are chosen as the line leader and secondary line leader due to their happy horses, higher levels, and experience in dressage.
-
Rider 3 is placed third because they are a novice rider, even though rider 3 is a high level and maxed/happy. However, this placement is optional. If an experienced line lead is not needed, rider 3 can be placed ahead of rider 1 or 2.
-
Rider 4 is placed ahead of rider 5 due to the level difference in their horses.
-
Rider 6 is placed at the back of the line because they are on a sad horse and a sad horse will always go at the back of the line, regardless of levels.
It is strongly recommended that dressage clubs have a set requirement regarding happy and maxed horses. If the rider line has varying horse levels and happiness, this can greatly affect the rider line speed, agility, gaps, alignments and more. Within dressage, having maxed and happy horses is very important for the success of the routine.
Screen Delay
Screen delay is a major factor in commanding and teaching SSO dressage.
In order to command dressage successfully, the commander must understand the technicalities of screen delay. What the rider sees versus what the commander sees are two very different things. Screen delay affects every aspect of dressage, and keep in mind that specific factors will affect screen delay differently.
It is recommended to first learn the basics of screen delay before learning commanding screen delay.
Visit Chapter 3 - Screen Delay:
Call Timing
Call timing is when the riders are seen, on the Commanders screen, reacting to the Commanders call.
1.5 Seconds
When the Commander calls "Go" the riders will be seen performing the move on the Commander's screen 1.5 seconds after go is called. This is due to screen delay and call delay.
Call timing is affected by a few factors: screen delay and call delay. Call timing is an important key to consider as a Commander.
Gaps
Gaps from the Commander's screen will look very different compared to what the riders see on their own screens; this is due to screen delay. The diagrams below demonstrate how gaps will look for the Commander - please note, all of the diagrams are shown from trot screen delay.
The white horse represents what the Commander will see, the pink horse represents where the rider see's themselves on their own screen, and the brown horse represents the rider ahead.

Fully Inside
The diagram above demonstrates the difference of FI gaps from the rider's screen versus Commander's screen. The rider (pink horse) sees themselves Fully Inside with the rider ahead on their own screen - however, on the Commander's screen (white horse); the Commander sees the rider slight behind NTT to the rider ahead.

Half Horse
The diagram above demonstrates the difference of Half Horse gaps from the rider's screen versus the Commander's screen. The rider (pink horse) sees themselves half of a horse spacing away from the rider ahead on their own screen - however, on the Commander's screen, they see the rider (white horse) a one horse length and half behind.
Alignments
Alignments from the Commander's screen will look very different compared to what the riders see on their own screens; this is due to screen delay.
The diagrams below demonstrate how different alignments will look for the Commander versus the rider. The white horse represents what the Commander will see, the pink horse represents where the rider sees themselves on their own screen, and the brown horse signifies the other riders in the alignment.

Tier Alignment
The diagram above demonstrates the difference in tier alignment from both Commander's and rider's point of view. The rider will see themselves comb with their partner and half horse spacing from the rider ahead, however, the Commander will see the rider in line with their tier partner.

Staggered Alignment
The diagram above demonstrates the difference in staggered alignment. The rider will see themselves Halfway Inside to their partner (the rider across from them) while the Commander will see the rider roughly NTT to their partner.
Walk Comb

Trot Comb

Canter Comb

Comb Alignment
The diagrams above demonstrate the difference of comb alignment between the rider's screen and the Commander's screen; keeping in mind that screen delay changes depending on the rider's gait. On the rider's screen (pink horse) they will see themselves ahead of the rider line, whereas on the Commander's screen, they will see the rider (white horse) in line with the rest of the riders: if in proper comb alignment.
Markers
How riders interact with specific markers will look different on the rider's screen compared to the Commander's screen. This is due to screen delay, but it can vary due to other factors such as the rider's gait, the type of marker, the type of move, etc.

This diagram shows a specific example of how a canter bounce off of X will look different on the rider's screen versus the Commander's screen.
On the rider's screen (white horse) the rider sees themselves cantering right overtop of X.
On the Commander's screen (pink horse) the commander sees the rider canter bouncing before reaching X.
The longer the rider is straight on the marker, the less of a difference there will be between the Commander & rider's screens.
Go timing: Walls & Markers
The following diagrams demonstrate how call timing and screen delay affect "go" timing in relation to the wall or markers. There is a border where the Commander can call go without the call being too late for the rider's screen.
White Horse: Rider's POV (where the rider sees themselves on their own screen)
Pink Horse: Commander's POV (where the Commander sees the rider on their screen)


In the diagrams above, the white horse refers to the rider on their own screen while the pink horse refers to the rider on the Commander's screen. The dotted line refers to the marker in question, in this diagram it is the wall line.
The diagrams demonstrate the latest the Commander can call "go" in relation to the marker/wall.
At a walk the distance is 5 meters.
At a trot the distance is 7.5 meters.
At a canter the distance is 10 meters.

If the rider is trotting, the latest the commander can call "Go" is when the rider is 7.5 meters away from the marker/wall on the Commander's screen. On the rider's screen, the rider will be roughly 5 meters away from the wall/marker and therefore they will have enough space to do what was called (for most moves/commands).
Arena Timing
Arena timing refers to different rider lines or partners being synced in timing and reaching markers at the same time on the Commander's screen.
Good arena timing would mean that two rider lines or partners are meeting a center point or opposing markers at the same time on the Commander's screen.
Late arena timing would mean the two rider lines or partners are not meeting the center point or opposing markers at the same time on the Commander's screen.
Many aspects can negatively effect arena timing, such as veering, late go timing, J-corners, etc.
Arena timing ensures that opposite rider lines or pairs of riders are matched in their timing and reaching specific markers at the same time. If arena timing is not maintained, the riders will not be symmetrical.


On the Commander's screen, the paired riders or rider lines reach opposite markers at the exact same time.
On the rider's screen, their partner should reach the opposite marker after their own tail has passed over their own marker - the rider should reach their marker a horse length ahead of their partner (trot screen delay).


On the Commander's screen for arena timing in circles, the paired riders or rider lines reach opposite circle markers at the exact same time. The riders should be reaching the circle markers on either side of X at the same time.
On the rider's screen for arena timing in circles, their partner should reach the opposite circle marker after their own tail has passed over their own marker - they should reach their circle marker a horse length ahead of their partner (trot screen delay).
Teaching New Moves
When teaching new moves to a group of riders, it is important to ensure that the riders are being taught in an efficient and in-depth manner as this will increase their success in learning the new move, especially for more complex moves and sequences.
Explain & Demonstrate
When teaching a new move to the rider line, start out with first explaining the description and fundamentals of the move and then do so again while demonstrating the move.
Individualized Practice
Break the rider line down into small groups or allow the riders to practice the move individually. It is much easier for riders to learn one at a time. During this step, provide feedback.
Perform Together
Once all of the riders are confident riding the new move, have the entire rider line perform the move together. Be sure to let the riders know when they have done the move correctly!
When teaching new moves, it is highly recommended to demonstrate and explain the move while the riders are halted and not while they are trotting around the arena. It can be very difficult for the riders to understand the move while they are trying to focus on riding in line.
Additionally, it can be very helpful to teach the move to each rider individually or in small groups. When in a long rider line, it can be very easy for the riders to become disoriented and distracted by what the other riders are doing. When the rider can practice the move by themselves, they are much more successful at understanding the move.
tip
When explaining a new move or sequence, limit the amount of words you use. Avoid filler words and try to avoid over-explaining. Focus on using a limited amount of words that are easy to understand and descriptive, this will help with attention span and the rider's ability to follow what you are trying to say.
tip
When demonstrating the move, be sure to do so from the orientation of the riders as well as the direction in which they will perform the move in. In doing this, it can make the demonstration more understandable. Additionally, be clear about when the demonstration starts and ends.
provide breaks! Breaks are very important, as performing dressage for a long period straight is strenuous on the riders. Be sure to halt the riders occasionally and provide short breaks where the members can step away from their computers.
Breaks greatly improve learning ability and attention span!
Teaching Routines
When introducing a new routine to a rider line it is important to have the routine prepared before hand. Providing a well written document describing the routine is helpful as the riders will be able to follow along with what you are saying and they can also use the document for later review (homework).
When teaching the routine, break it down into brief sequences and teach part by part, once ready add all sequences together and perform!
Explain & Positions
When teaching new routines, first start by briefly explaining the outline of the routine and then provide each rider their position and placement, line orders, partners, etc.
Breakdown
Breakdown the routine into sequences and chunks and practice one sequence at a time and then reset from beginning to add in the newly learned part. During this step, explain any fundamentals needed for the different moves.
Practice
Practice the routine all together, only pausing and resetting if needed. During this step, provide individualized feedback and make any changes needed. It is helpful to film practice runs so the riders can see from the Commander's view, this also allows for riders to study the routine.
Before introducing a new routine to the riders be sure to have the routine ready and written with a set plan. As Commanders, it is important to study your own routine and have it memorized. Testing before teaching is highly recommended.
Be patient and remember that the more difficult the routine, the longer it will take to teach!
tip
Within PQL, we would provide rider POV videos for each routine. The Commander would film themselves riding each part of the routine and during the video, the Commander will call out each move and explain the routine. The demonstration videos helped the riders understand what the routine should look like from their point of view and it also allowed riders to study the routine outside of practice, which in turn helps prepare them for when they perform the routine.
tip
When PQL has a difficult routine with many different parts, we break practice up into 15 minute lessons. Each rider, or pairs of partners, would be given a 15 minute time slot and during that time they would get a one-on-one lesson on their part of the routine. This allowed each rider to get individualized attention, which greatly increased their understanding. It also prevented other riders from having to stand waiting while a part of the routine they were not in was being explained.
2.
Commander's as Teachers
by Flaw - Capri Lakeshield
Lesson Plans
Every single practice or lesson, we are setting out to teach riders something, be it a routine, move, or even fundamental skills. If you do not plan out how you'd like to do this, you will find yourself and your riders frustrated by a lack of progress.
Here are some key tips on developing a lesson plan:
Work Backwards
Break what you want them to end up knowing into smaller pieces that you can add on to each other
Play New
Imagine you've never heard of this concept before, what would you want to know?
Make Notes, Not Scripts
Write out small snippets of concepts or key definitions, but give yourself space to teach what your riders need, rather than reading out a script.
Feedback
Feedback is the bread and butter of all things instructing. If you aren't giving feedback, your riders aren't learning anything! Everyone develops their own style of feedback, but the following are a few fundamental components that will take your teaching up a notch.
Nervous Humans Cannot Learn
Adrenaline shuts down the part of the brain that records information. If your riders are nervous or stressed, they physically cannot retain the lesson you are trying to teach them. Let this concept be at the forefront of your mind when approaching a group of riders.
Motivation
Riders can tell when you're stressed, exhausted, or just plain don't want to be there. If you aren't motivated, they don't stand a chance. Similarly, if you aren't happy with a routine or performance, don't let that impact your mood overall. A lack of motivation in leadership will quickly sap motivation in your riders and produce sub-par performance. If you need a break, take one!
Be Specific
Giving feedback to the rider line as a whole can slow improvement, as riders will assume every broad negative feedback applies to them, and none of the positive does. Target specific riders and specific actions with your feedback.
Give Tasks
Giving riders specific tasks to focus on improves their ability to improve quickly. By doing some of the "leg work" for them, they are able to dedicate brain power to learning and implementing the solutions you've suggested. As riders advance, you can give them more space to find their own solutions to issues they may be facing.
When giving feedback, there is a specific structure we recommend you follow to ensure your riders feel confident and understand that you see their successes as well as their mistakes! This structure is called: Praise, Suggestion, Praise.
Praise
Lead with something a rider is succeeding at, this can be anything! It's even more helpful if it's related to the mistake, but it doesn't have to be.
Suggestion
Here is where you give your rider what they need to work on. Avoid words like "bad" or "messy", focus on where precisely they went wrong.
Praise
Finish off with a reminder about what the rider is doing well at. If you can't find something to compliment, you're probably overfacing your riders!
Test Your Knowledge!
Read the feedback below and decide how you feel about it, then hover over each box to see how well that commander did!
"Great work! Just try to clean up your L corners a little bit, but keep up the nice riding otherwise!"
This commander did great using PSP, but did not give the rider specific praise, nor tasks to fix where they were going wrong.
"Try to really check your straightness before cantering up in comb to avoid veering."
This commander gave great task-based feedback, but did not give the rider any examples of success to feel proud of.
"Your go-timing was great there, just make sure you're tracking your odds and evens so that you can go the correct way. Combine it with the go timing and you'll nail it."
This commander did great using PSP, and gave our rider specific, task-based feedback with a positive tone. This is perfect!
Handling Mistakes
Let's face it, sometimes things don't go quite the way we hoped. When mistakes happen, there is a simple framework you can follow to address them and move forward without shaking rider confidence.
Regardless of skill, experience, and knowledge - every rider and commander will make mistakes at some point. Mistakes are simply a part of dressage; it is natural and common to make mistakes as we are all human at the end of the day. Mistakes happen and that is OK! Keep calm and continue forward, mistakes do not define you as a dressage rider - instead, how you recover from that mistake is what defines you as a skilled rider!
Ending The Lesson
When we end a lesson, we want riders to feel like they clearly understand what they learned, they have things to work on, and they are looking forward to the next one.
It is best to wrap up a lesson in the following manner:
End on a High Note
Try to wrap up with something you know your riders will succeed at.
Quick Summary
Give a quick summary of what you went over.
Prompt for Questions
Give your riders a clear time to ask questions if they have any, and pause after you invite questions.
Thanks & Welcome Feedback
Always thank your riders, and invite them to contact you after the lesson with any feedback.
3.
Commanding
Commanding Terms
The PDM uses a variety of commands for different scenarios in dressage. Commanding terms help the commander make quick calls that the riders can easily understand and use as guidance while performing.
Commanding Terms

Fluency & Tone
This section is taught during PQL's 7 week Commander Trainee course. When new commanders are being trained in PQL, we spend time focusing on their tone and how they speak to the riders - as this is vital for a positive and fun environment.
How the commander presents themselves during dressage practices will greatly influence the overall environment. The way a commander speaks is incredibly important as what the commander says and how they say it, is the primary stimuli during dressage practice. How a commander conducts themselves can help determine how enjoyable dressage practice is for the riders.
Have you noticed that your riders keep going AFK and many are leaving practice early?
A good indicator to knowing if the riders are enjoying practice is their attendance. If the riders are constantly going AFK and many are leaving practice early without prior notice, it could be a sign that they may not be enjoying practice. If the riders are highly engaged, they are most likely enjoying practice.
During dressage practice, the riders mirror the commander's emotions and tone.
Mirroring Emotions
If the commander's tone is dry, monotone, and slow - the riders will feel this and they will respond with similar emotions, resulting in the riders most likely feeling bored, tired, and uninterested.
If the commander's tone is exciting, fast, and fluctuates often - the rider's will mirror this feeling and they will also feel excited.
The commander's presentation is the heartbeat of the environment. If the commander presents themselves as grumpy, tired, bored, frustrated, etc. - the environment will become those emotions and the riders will begin to feel that way as well.
If you are having a bad day, try to be honest with the riders if possible - you don't need to go into detail, but let them know that how you are feeling is not because of them. When the commander seems upset, the riders may think that they are the reason the commander is upset.
Don't forget, dressage should be fun and exciting!
Tone
During dressage practice, try your best to create a stimulating environment by speaking with excitement. Fluctuate your words often and emphasize anything important. Avoid harsh tones and instead try to speak kindly and encouragingly.
Fluency
During dressage practice, try your best to speak clearly. Avoid long pauses but also avoid talking too much as over-talking will affect the rider's attention span. Focus on what is important to say and avoid using filler words. Try to keep the commanding fast-paced but still easy to follow.
Regarding fluency, an important factor to keep in mind is the rhythm of how the commander calls commands. For example, calling "Pre" and "Go".
The general rule of thumb for command rhythm:
move set
breath
pre
breath
go
Whatever your rhythm is, try to keep it as consistent as possible as the riders will begin to depend on this rhythm and react to it via muscle memory. Taking a breath between "Pre" and "Go" can help with keeping the rhythm consistent.
Additionally, say each word with confidence so that the riders hear you clearly. Try to avoid saying the commands under your breath or softly.
record yourself!
Listening to yourself command is an incredibly helpful tool as you will be able to hear what you sound like. Oftentimes, we don't realize what our tone sounds like and how we come across to others. Recording yourself commanding helps you to hear what you are doing well and what may need some work!
Phrases
Another important factor in commanding is what the commander says. Certain words or phrases can positively or negatively impact the environment.
Positive Phrases
"We can do this!"
"Let's try again, we are so close!"
"That was a great attempt, let's try again."
"I believe in us."
"Looks like I may have explained that wrong, let me try to explain it better this time."
Negative Phrases
"We can't do this."
"That looked... interesting."
"That was so bad."
"I don't know what just happened but okay."
"Uh okay, let's not do that again."
"What are you doing? I didn't say to do that."
Confidence
It is important that the riders feel like they can trust their Commander, as this will help to encourage confidence in the riders.
If the Commander is constantly saying "I don't know", "I don't know what that was", "I don't know why that happened" or that it is clear they are consistently unsure of themselves and the dressage practice, it can create a lack of confidence within the arena.
Of course, there will be times when a commander is unsure of something or doesn't know why something happened (we are still human after all), but it is how they portray that uncertainty that matters.
for example
"I am not familiar with that move, I will spend some time learning it before I teach it. I don't want to accidentally teach it incorrectly".
"It looks like there may have been a mistake during the move but I missed what it was. Let's try again so that I can see what might have happened."
Don't be afraid to ask for help! Ask other commanders or ask the rider line. The riders are very inquisitive as they are the ones actually performing the dressage, they can be a very helpful aid any time a commander is uncertain of something.
Lastly, don't be hard on yourself. There is no perfect Commander and we all have good and bad days! Commanding is a skill and the more you practice it, the better you will become. If you want to know what works well and what does not, ask the riders. Be open to feedback, as this will help you grow.
"To teach is to show. You can't teach what you don't know. You can't guide where you don't go. And you can't grow what you don't sow." K. Hall

